It is a familiar problem – you have uploaded a photo that looks great to Facebook. Facebook works its magic and a few seconds later that same image is there for the world to see …and now it has lost its sharpness, it is not centred properly and the colours do not look right. Or, perhaps you want to send your image to someone who needs to add it to your web site. Facebook seems like an easy option to transfer the file but again image quality fails. Why? How does image optimization for Facebook work?
The quick answer
- Preserve the original colour profile where possible
- Scale/crop to 2048 x 1365 pixels
- set quality/interpolation to cubic (also called bicubic)
- establish file type – .jpg, .png, or other
Occasionally, clients use our images which have been given to them as proofs, or in a format intended for, say, web site display and the client has used the image for social. This can lead to poor results, usually to do with colour profile. For instance, images which look fine on a desktop monitor, but look dark on a mobile phone’s small screen. Small images usually need brightening to keep the same brightness in their larger size. Indeed, one image might need to be edited a few ways to suit different purposes.
The long answer
Really, there is no quick answer for optimizing images for Facebook or other “social” platforms. Good quality images are your chance to keep your viewers’ attention for long enough during the all-judging “scroll of death” to cause them to pause and read your post.
The rest of this article explains how high quality images need planning and editing even if they are to seem “spontaneous” in social media. The process starts before you take your picture, not after.
Camera settings are your friend
In the mobile phone age, you can take a picture and upload it straight away to social media sites like Facebook, Instagram and Linkedin. So, understand what your platform needs to deal with your picture. Then, find settings in the camera’s <advanced> settings. The more settings you match to your platform, the better your chance of attracting your market, so learn how to use them.
Orientation: lanscape, portrait, …square?
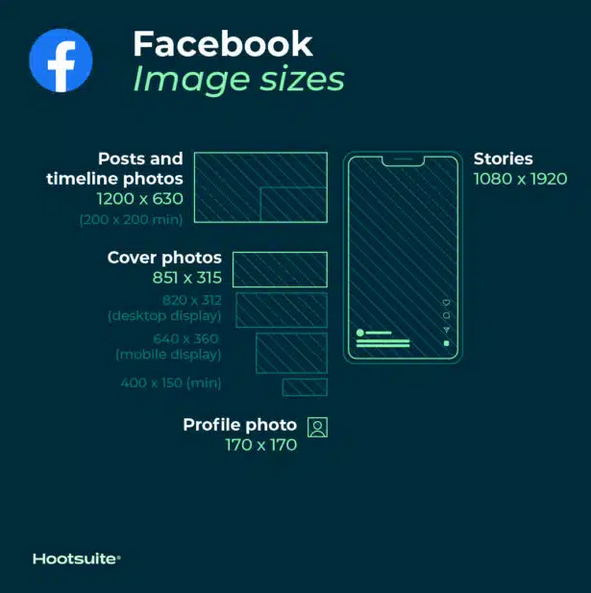
Image orientation is important because different “social” sites display your images differently. Your image is formatted automatically if it does not already meet pre-defined standards for that platform. Facebook optimizes photos to an aspect ration of 1.91:1 (for instance1200 x 630 pixels). Banners etc. rely on different resolutions in Facebook. Instagram likes images that conform within a range of 4:5 and 1.91:1. However, Instagram stories and “reel”, needs 9:16, which is “cinematic”, except oriented in portrait rather than landscape. Already, how you frame your shot now depends on how your camera has to be oriented.
Dimensions are confusing
Confused? Don’t worry. Even professionals have to tread carefully. No two social platforms share common image dimensions and this poses problems for everyone. Banner images, profile images, and post images all have special considerations too. For cheatseats including major platforms including others like Linkedin, Pinterest, Snapchat and YouTube, see Hootsuite.
Why can’t social platforms just run with what you upload? Sometimes, you need to anticipate where a profile image is going to display on a banner image. That can depend on what device a viewer sees you page with.
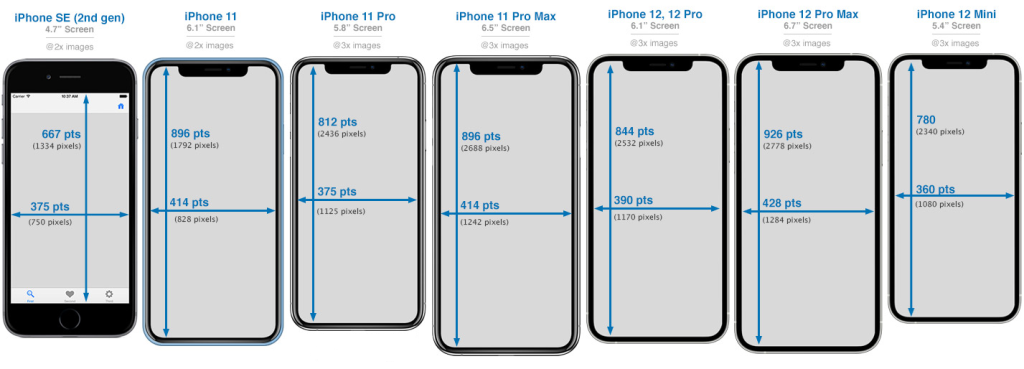
There are otrher reasons too. Look at the different sizes of iPhone screens below. Web site designers aim to engineer consistent displays for all kinds of differently sized screens, including tablets, laptops, and desktops. The phones below are in portrait orientation. Now, turn a phone (or a tablet) on its side. What happens to a picture now? It is hard to find one set of dimensions that suits all eventualities. Defining image sizes helps programmers find an optimum size.

Image size
Image size also affects how your image is optimized when it arrives at Facebook or other social sites. Size is loosely compared to an image’s pixel resolution and image type affects file size too. For instance, most consumer cameras save pictures as .jpg to achieve a file size of 500kb to perhaps 3mb. Professional photographers might take a picture using the same pixel size as your mobile phone picture and end up with a huge “.raw” file measuring 50mb – 100mb.
The difference is that by default a consumer phone/camera chooses optimizations for you. That is fine, but software does not always make good decisions in unusual situations. Professional photographers have a “raw” file that is infinitely customisable for any data that is within the bounds of the picture’s “histogram. Today’s professional cameras allow photographers to take pictures “raw”, process them on their camera, and forward processed .jpg’s to news rooms and social sites.
Image orientation and size = problem
This is a problem for “social” because usually the images you upload are too large – even a picture taken with a mobile phone. Facebook can not afford the server storage necessary to save every image that users “just” upload. Moreover, your “wall” has already been programmed to use strict dimensions to display your image. So, Facebook, Insta, whoever – will crop your image to meet its standards, and it will compress the image size which may disrupt image sharpness and colour accuracy. This is why image optimization for Facebook and other platforms is important: it gives you control over your output.

Lastly, file formats matter too – some images suit .jpg. others .png, and even the platform you are uploading to may have preferences.
Solution – optimize first, then upload
You can guarantee quality with image optimization for Facebook and other platforms. Use the checklist below so that the quality you see in the picture you upload pre-empts unpredictable machine results. Even before you edit your pictures for upload, plan your image first:
- What social media platform are you using?
- Establish aspect ratio in camera settings
- Camera image stabilization helps
- Frame/compose images to anticipate profile picture placement etc
- Avoid errors – take multiple shots
- Use ratios/orientations for other potential distributions
- image may need to display in portrait AND landscape
- the smaller the image, the greater the image’s brightness needs to be
- Preserve original colour profile where possible
- Scale/crop to 2048 x 1365 pixels
- set quality/interpolation to cubic (also called bicubic)
- establish file type – .jpg, .png, or other
Contact us, or use the WhatsApp link on this page to find out more about image optimization for Facebook, other platforms, and web site display.